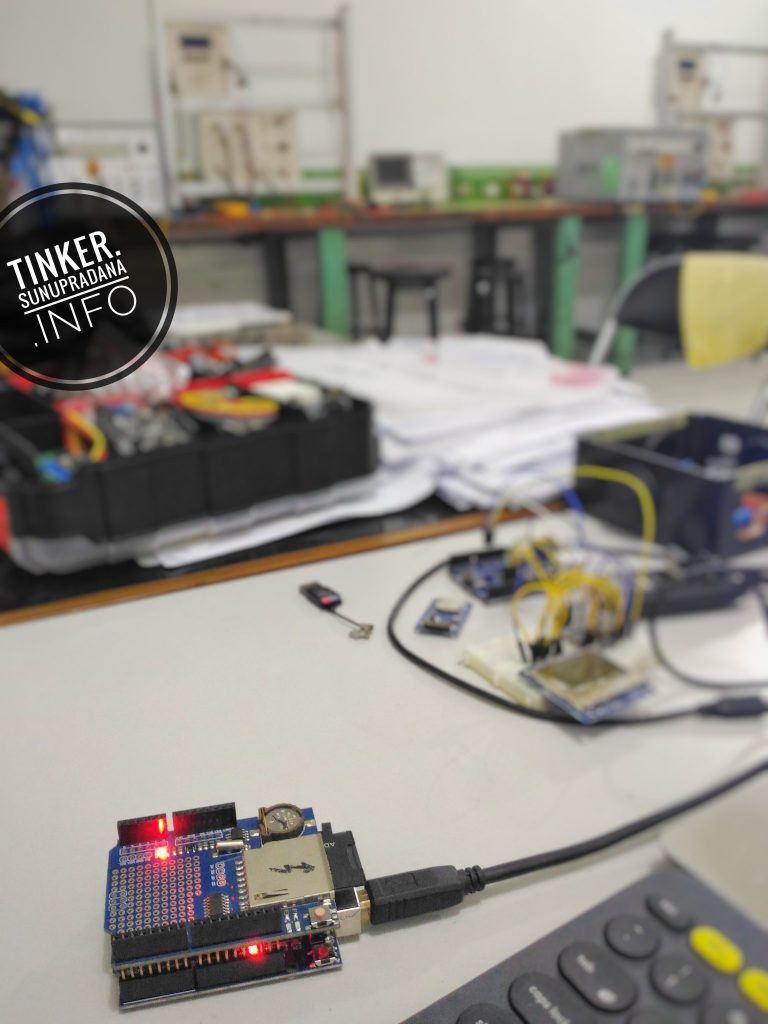
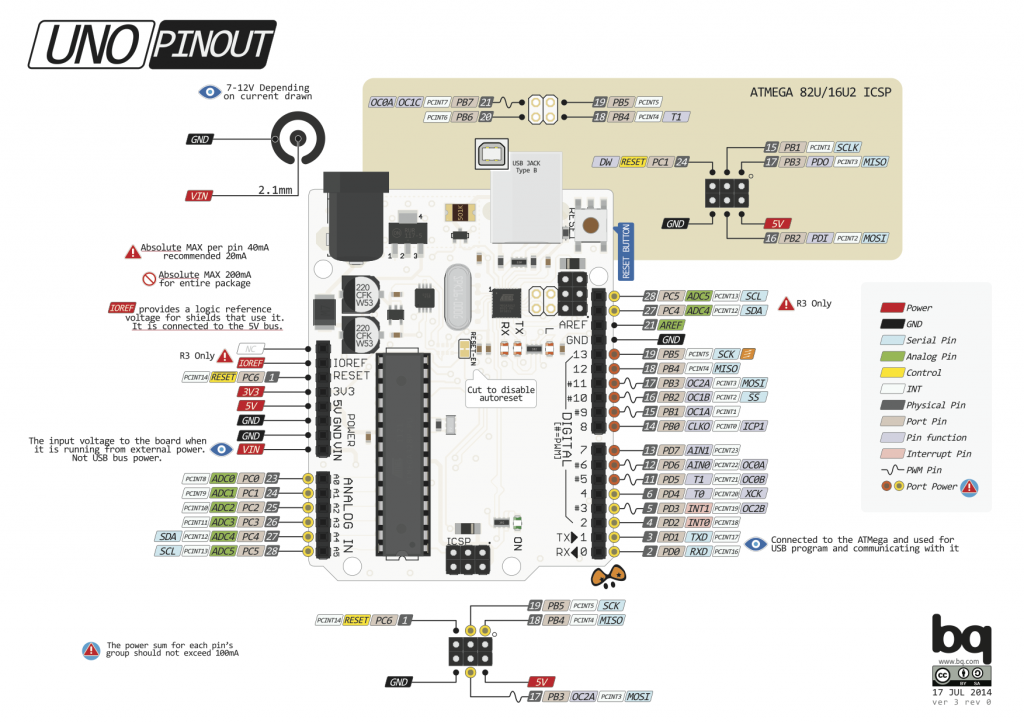
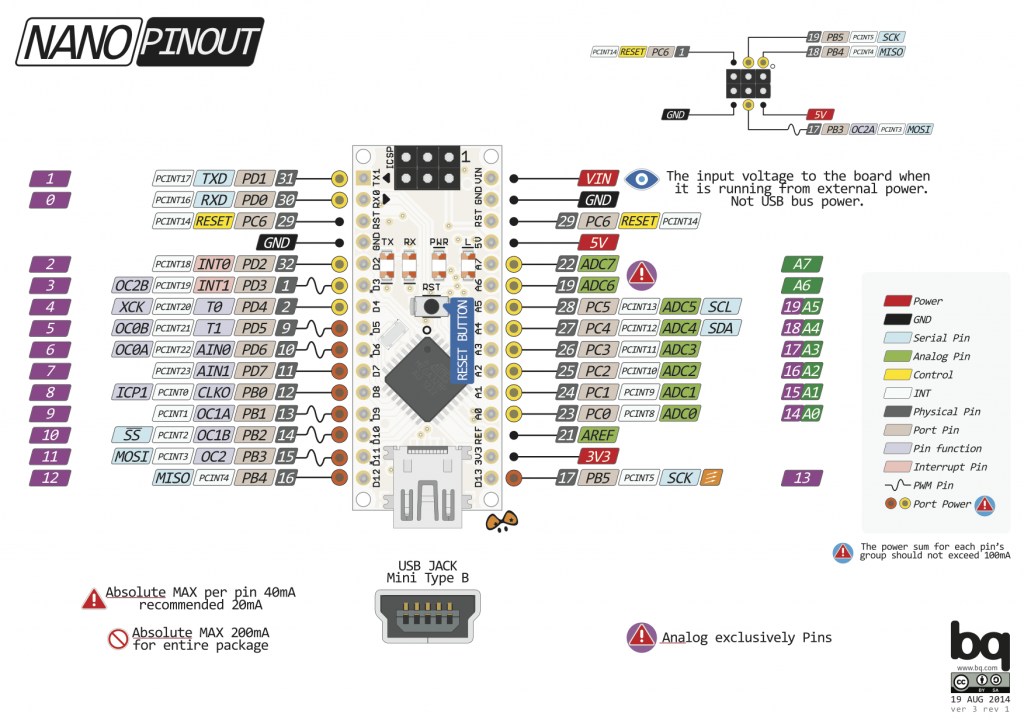
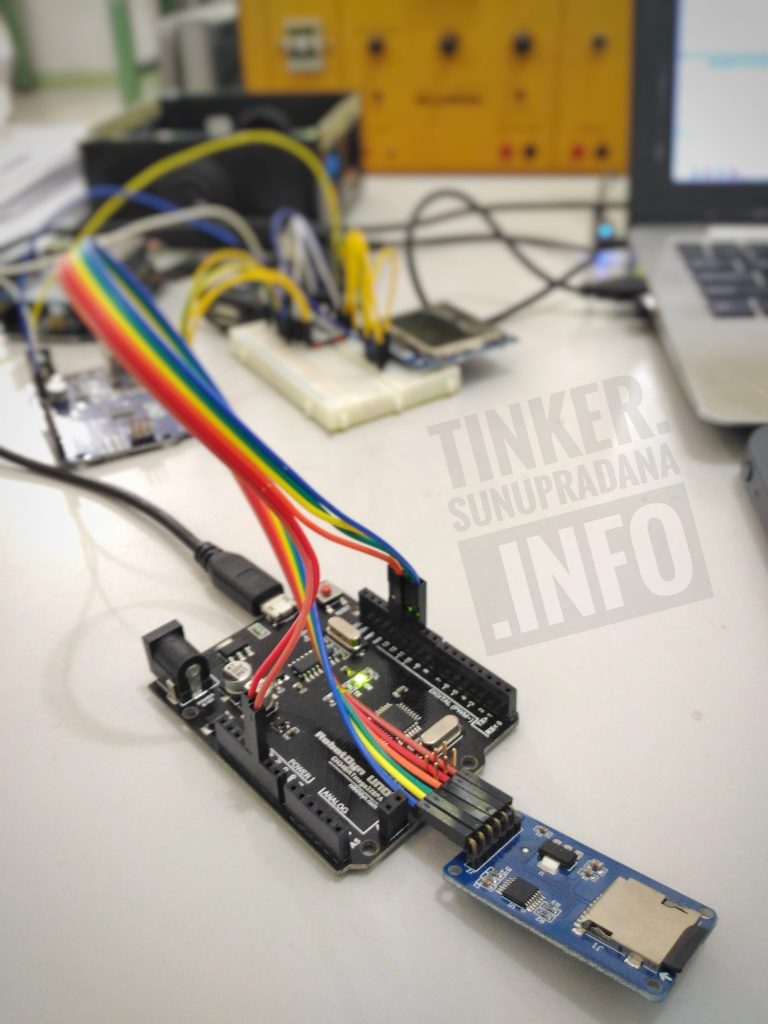
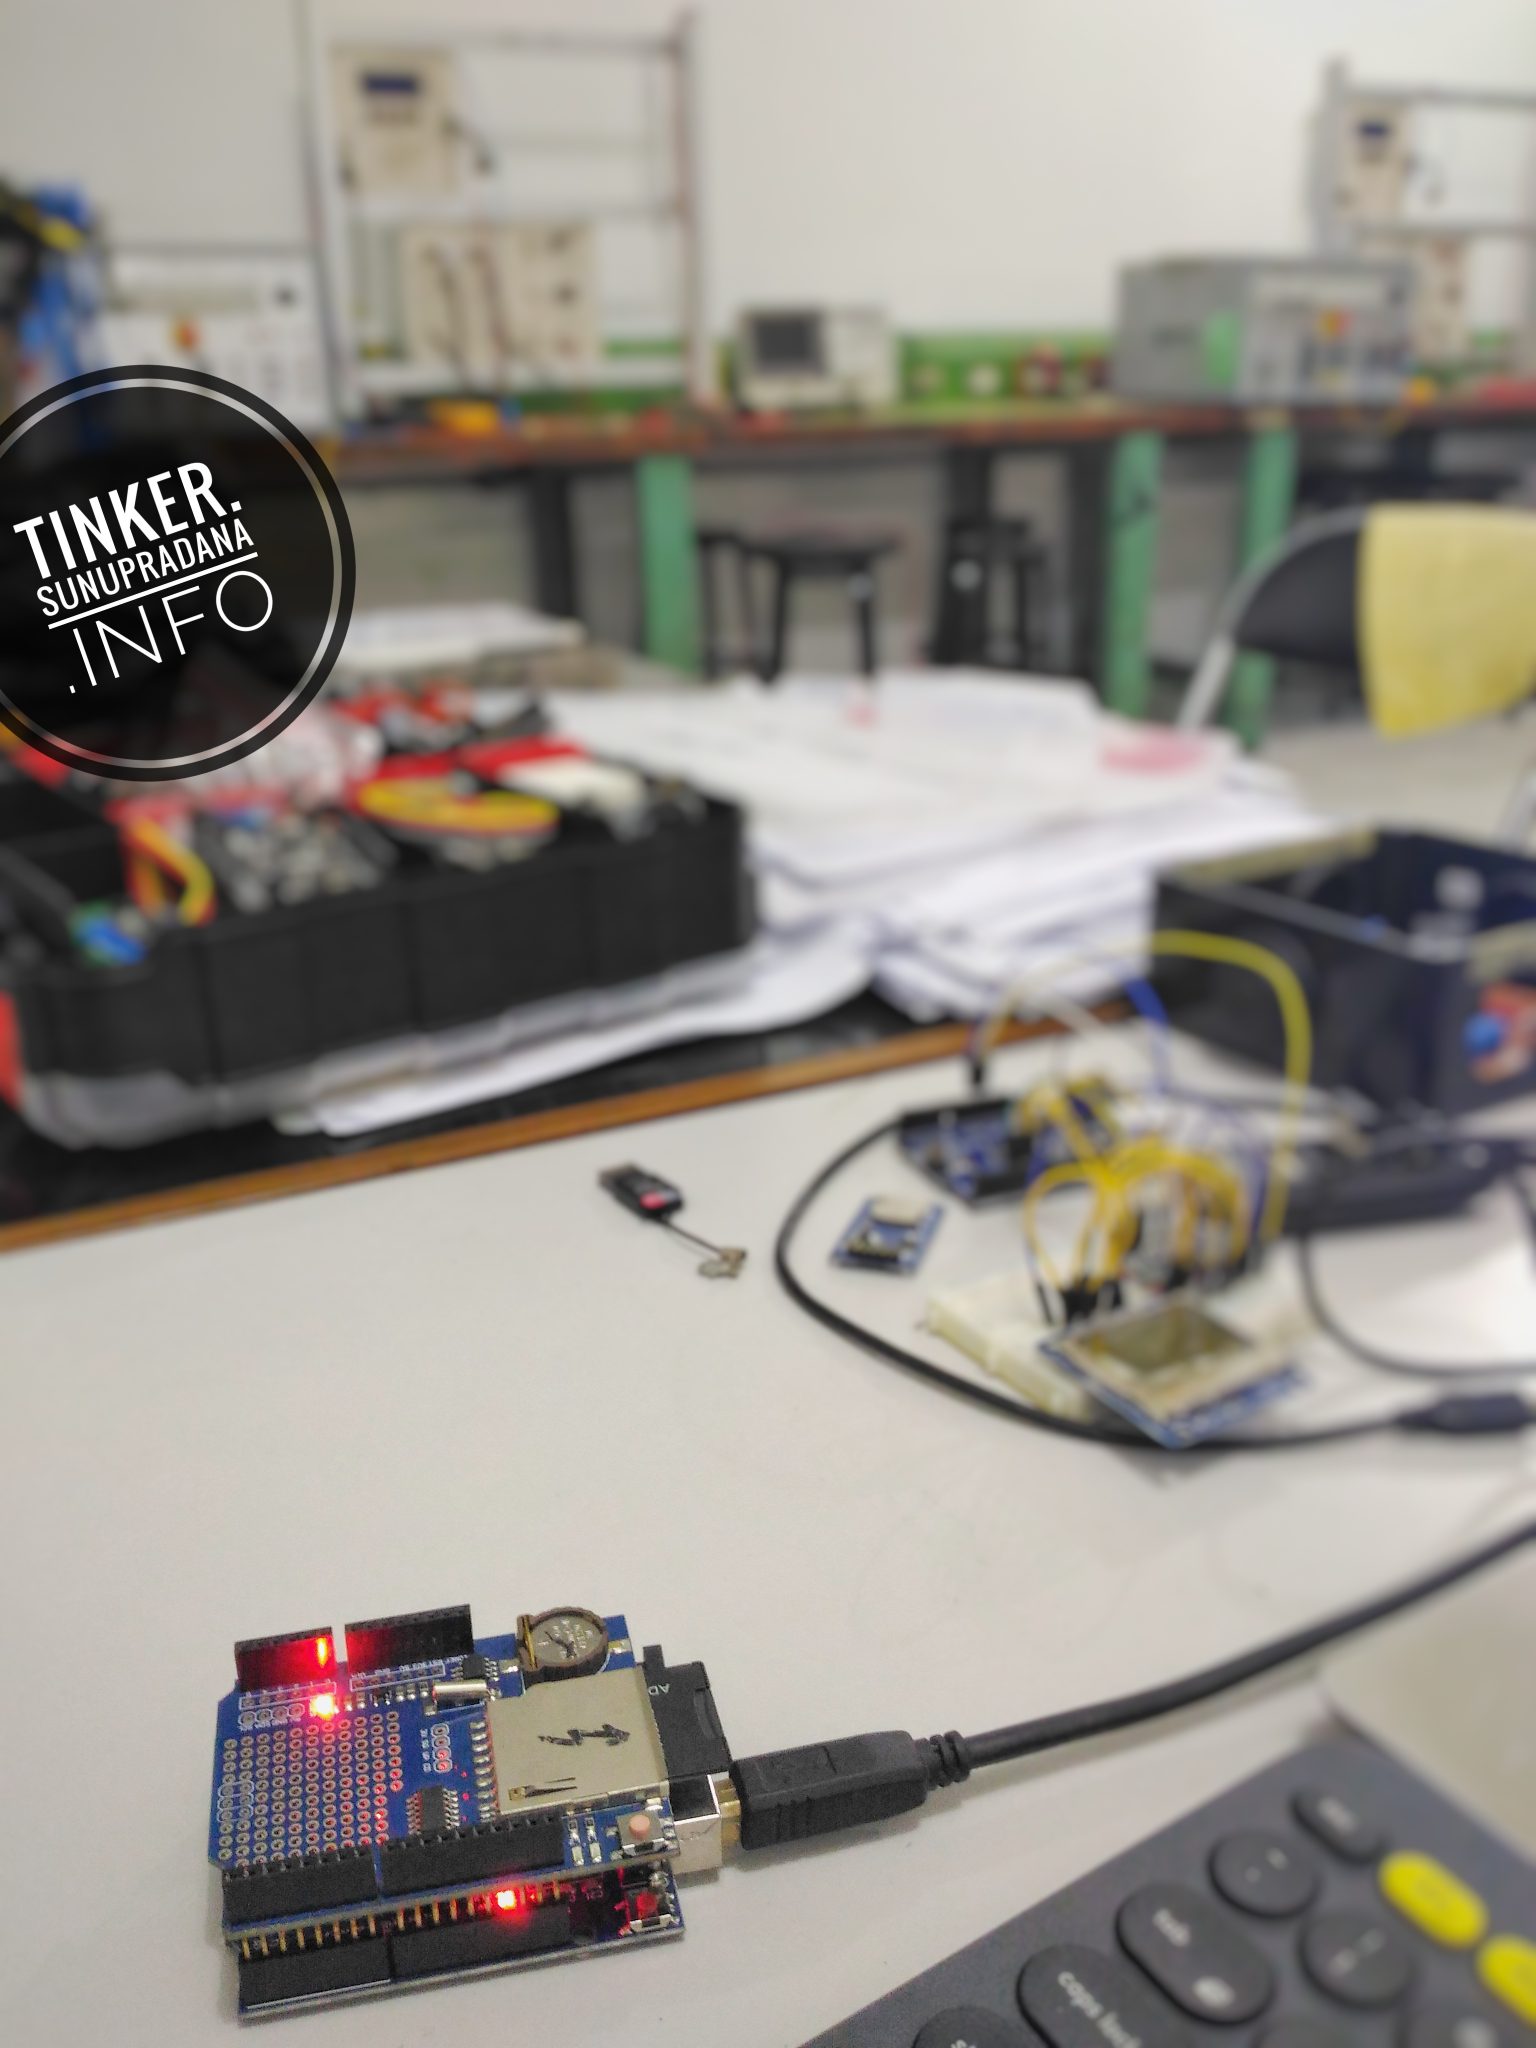
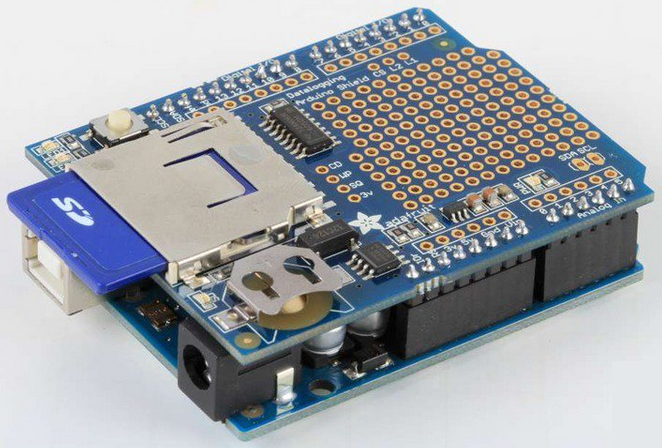
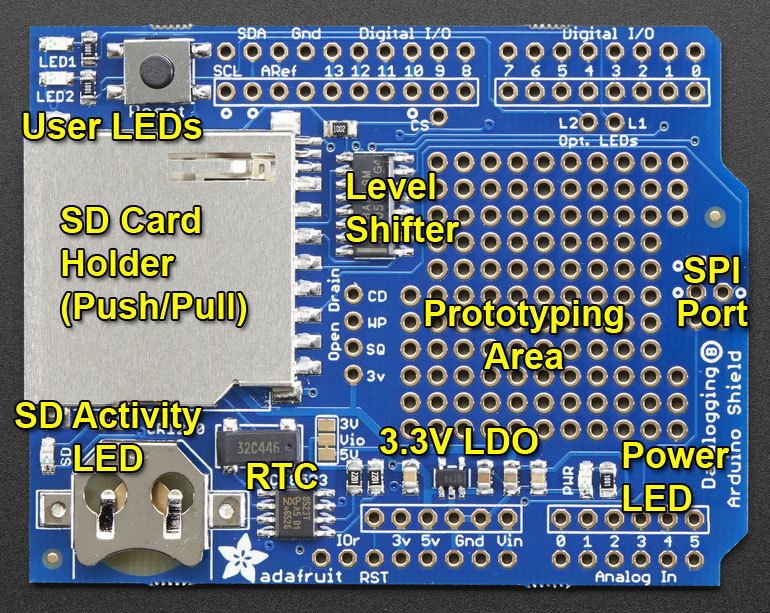
Pada mashup sebelumnya, telah diungkapkan mengenai data logging shield. Di papan logger yang ditujukan untuk ukuran papan Arduino Uno itu sudah terdapat RTC. Namun ukuran sistem itu relatif besar dan karenanya pin papan itu tidak mudah diterapkan di sistem lain seperti papan Arduino Nano atau papan Arduino Micro. Alternatif lain adalah MicroSD Card Adapter seperti yang akan ditampilkan di halaman ini.
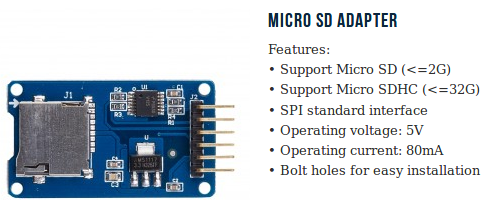 Gambar 1. [elabpeers.com]
Product Description
Support Micro SD Card, Micro SDHC card (high-speed card)
The level conversion circuit board that can interface level is 5V or 3.3V
Communication interface is a standard SPI interface
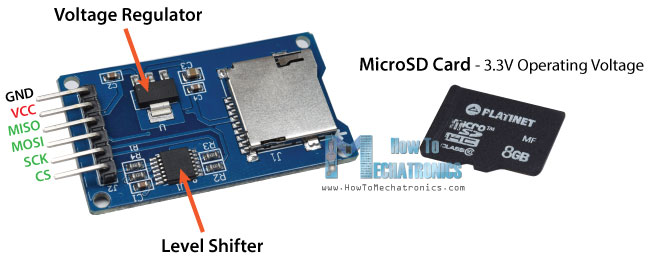
Control Interface: A total of six pins (GND, VCC, MISO, MOSI, SCK, CS), GND to ground,
VCC is the power supply, MISO, MOSI, SCK is the SPI bus, CS is the chip select signal pin;
3.3V regulator circuit: LDO regulator output 3.3V as level converter chip, Micro SD card supply;
Level conversion circuit: Micro SD card into the direction of signals into 3.3V, MicroSD card toward the direction of the control interface MISO signal is also converted to 3.3V, general AVR microcontroller system can read the signal;
Micro SD card connector: yes since the bomb deck for easy card insertion and removal.
Positioning holes: 4 M2 screws positioning hole diameter of 2.2mm, easy to install positioning, to achieve inter-module combination;
Micro SD/TF Card Board Shield Module SPI Interface
This is a Micro SD / TF card module with the SPI interface, microcontroller system to complete the Micro SD card read and write files. Users can directly use the Arduino IDE comes with an SD card to complete the library card initialization and read-write. Support Micro SD Card, Micro SDHC card (high-speed card). The level conversion circuit board that can interface level is 5V or 3.3V.
 Gambar 2. [wtihk.com]
Arduino SD Card and Data Logging to Excel Tutorial :
 Gambar 3.

* Arduino SD Card Tutorial Example
*
* by Dejan Nedelkovski, www.HowToMechatronics.com
*/
#include <SD.h>
#include <SPI.h>
File myFile;
// int pinCS = 53; // Pin 10 on Arduino Uno
int pinCS = 10; // Pin 10 on Arduino Uno
void setup()
{
Serial.begin(9600);
pinMode(pinCS, OUTPUT);
// SD Card Initialization
if (SD.begin())
{
Serial.println("SD card is ready to use.");
} else
{
Serial.println("SD card initialization failed");
return;
}
// Create/Open file
myFile = SD.open("test.txt", FILE_WRITE);
// if the file opened okay, write to it:
if (myFile)
{
Serial.println("Writing to file…");
// Write to file
myFile.println("Testing text 1, 2 ,3…");
myFile.close(); // close the file
Serial.println("Done.");
}
// if the file didn’t open, print an error:
else
{
Serial.println("error opening test.txt");
}
// Reading the file
myFile = SD.open("test.txt");
if (myFile)
{
Serial.println("Read:");
// Reading the whole file
while (myFile.available())
{
Serial.write(myFile.read());
}
myFile.close();
}
else
{
Serial.println("error opening test.txt");
}
}
void loop()
{
// empty
}
[/code]
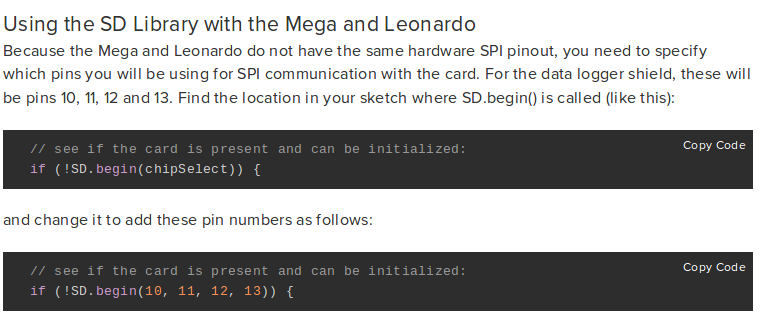
Code description: So first we need to include the standard SD and SPI libraries, create a “File” object and define the ChipSelect pin of the SPI bus, the pin 53 in my case for the Arduino Mega Board. For this example we want our code to be executed only once, so all the code will be placed in the “setup” section, while the “loop” section will remain empty.
So first we need to start the serial communication and define the ChipSelect pin as output. We have to do this because the ChipSelect pin needs to be “Low” so that the SPI communication between the module and the Arduino works.
Next, using the SD.begin() function we will initialize the SD card and if initialization is successful the “if” statement will become true and the String “SD card is ready to use.” will be printed on the serial monitor, else the string “SD card initialization failed” will be printed and also the program will be terminated.
Next, using the SD.open() function we will create a new file named “test.txt”, including the FILE_WRITE argument meaning that we can both read and write to the file. If the file already exist the SD.open() function will just open it.
So if the file has been successfully created first we will print the string “Writing to file” on the serial monitor and then using the myFile.println() function we will print the text “Testing text 1, 2 ,3…” into the file. After that we need to use close() function to ensure that the previous data written to the file is physically saved to the SD Card.
Next, we will see how we can read from the file. So again we will the same function, SD.open(), but this time as the file “test.txt” has already been created, the function will just open the file. Then using the myFile.read() function we will read from the file and print it on the serial monitor. The read() function actually reads just one character at a time, so therefore we need to use the “while” loop and the function myFile.available() to read all characters or the whole previously written data. At the end we need to close the file.
Now after uploading the code to the Arduino, if everything is ok, the following will appear on the serial monitor.
Arduino Data Logging
Now let’s make another more interesting example of data logging a temperature sensor. For that purpose we will use the DS3231 Real Time Clock module which has a built-in temperature sensor as well. You can find more details about how to connect and use this module in my previous tutorial.
So after connecting the two modules to the Arduino let’s take a look at the code for this example.
* Arduino Temperature Data Logging
*
* by Dejan Nedelkovski, www.HowToMechatronics.com
*/
#include <SPI.h>
#include <SD.h>
/*
RTC
Rinky-Dink Electronics, Henning Karlsen.
http://www.RinkyDinkElectronics.com/
*/
#include <DS3231.h>
File myFile;
DS3231 rtc(SDA, SCL);
// int pinCS = 53; // Pin 10 on Arduino Uno
int pinCS = 10; // Pin 10 on Arduino Uno
void setup()
{
Serial.begin(9600);
pinMode(pinCS, OUTPUT);
// SD Card Initialization
if (SD.begin())
{
Serial.println("SD card is ready to use.");
} else
{
Serial.println("SD card initialization failed");
return;
}
rtc.begin();
}
void loop()
{
Serial.print(rtc.getTimeStr());
Serial.print(",");
Serial.println(int(rtc.getTemp()));
myFile = SD.open("test.txt", FILE_WRITE);
if (myFile)
{
myFile.print(rtc.getTimeStr());
myFile.print(",");
myFile.println(int(rtc.getTemp()));
myFile.close(); // close the file
}
// if the file didn’t open, print an error:
else {
Serial.println("error opening test.txt");
}
delay(3000);
}
[/code]
Code Description: First we need to include the libraries needed for both modules, then create the two objects and in the setup section initialize them.
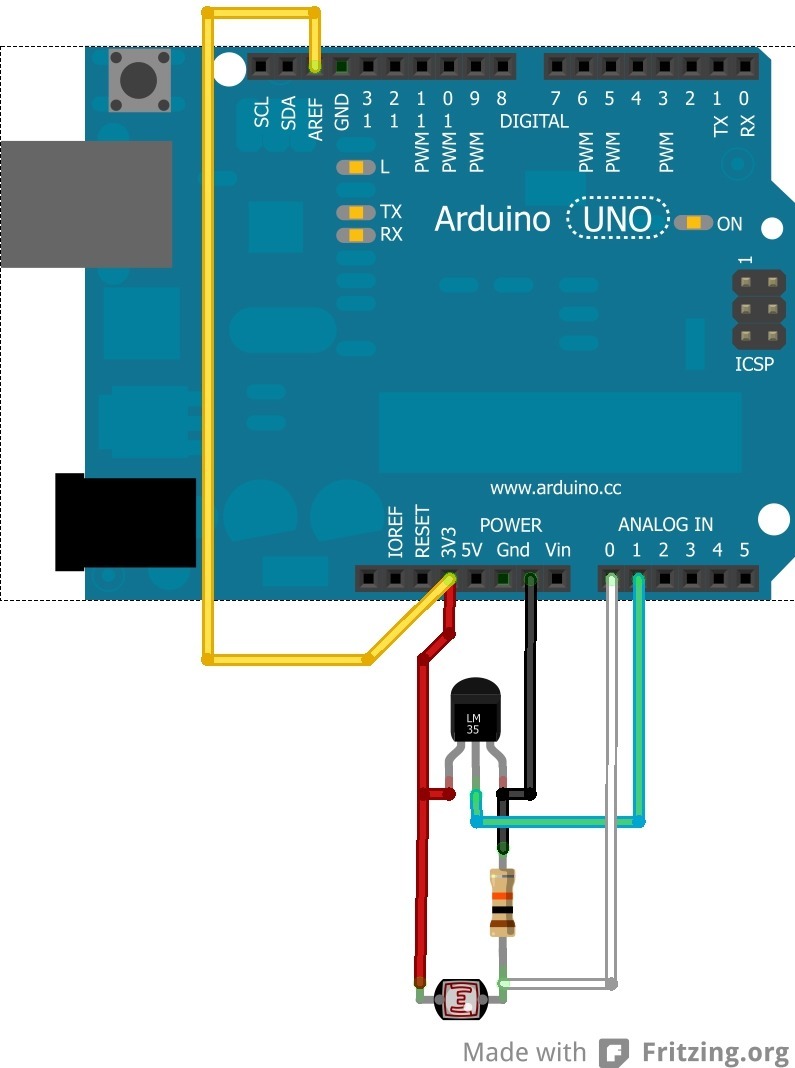
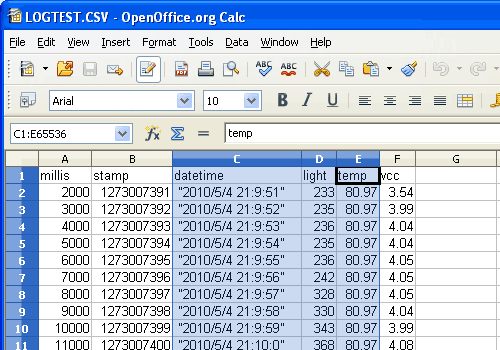
In the loop section using the Serial.print() funtion we will print the time and the temperature values on the serial monitor, with a “comma” character between them and a new line after the temperature value. We need this form of the lines so that we can easily import them and make a chart in Excel. Also note that the temperature values are converted into integers.
So these same values will also be written into the newly created “test.txt” file and at the end we just need to add a delay which will represent the interval of recording the temperature data.
After uploading the code the Arduino will start storing the temperature values each 3 seconds.After a while we can open the SD card on our computer to see the results.
Arduino LC Studio SD Card Tutorial :
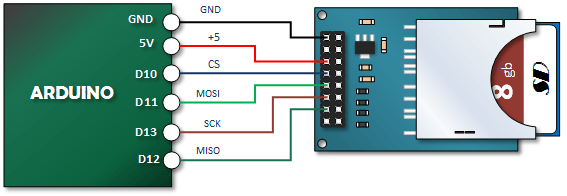
Gambar 4. [henrysbench.capnfatz.com]
// LC Studio SD Card Initializing Tutorial
//Connections: MOSI – pin 11, MISO – pin 12, CLK – pin 13, CS – pin 10
#include <SD.h>
#include <SPI.h>
int cs = 10; // Set Chip Select to pin ten
void setup()
{
// Open serial communications and wait for port to open:
Serial.begin(9600);
while (!Serial) {
}
Serial.println("Initializing SD card…");
Serial.println();
pinMode(cs, OUTPUT);
// Documentation says you’re supposed to do this
// even if you don’t use it:
pinMode(SS, OUTPUT);
// see if the card is present and can be initialized:
if (!SD.begin(cs)) {
Serial.println("SD did not initiliaze");
while (1) ;
}
Serial.println("SD initialized.");
}
void loop()
{
}
[/code]
Creating an SD Card File and Writing to It
[code lang=”C”] //Henry’s Bench// LC Studio SD Card Create and Write to File Tutorial
//Connections: MOSI – pin 11, MISO – pin 12, CLK – pin 13, CS – pin 10
#include <SD.h>
#include <SPI.h>
int cs = 10; // Set Chip Select to pin ten
File myFile; // a File Object
void setup()
{
//
char myFileName[] = "MyFile.txt"; // The name of the file we will create
// Open serial communications and wait for port to open:
Serial.begin(9600);
while (!Serial) {
}
Serial.println("Initializing SD card…");
Serial.println();
pinMode(cs, OUTPUT);
// Documentation says you’re supposed to do this
// even if you don’t use it:
pinMode(SS, OUTPUT);
// see if the card is present and can be initialized:
if (!SD.begin(cs)) {
Serial.println("SD did not initiliaze");
while (1) ;
}
Serial.println("SD initialized.");
// Lets check to make sure that the SD card doesn’t already have our file
if (! SD.exists(myFileName)){
// This next statement will open a file for writing if it exists
// If it does not exist, it will create that file. That’s what we’re doing here.
myFile = SD.open(myFileName, FILE_WRITE);
// This next statement checks to see if the file
myFile.println("My 1st Line of Data"); // Send Your First Line to that file
myFile.flush(); // Save it.
}
else{
// We got here because the file already exists.
// Therefore we’re simple opening the file and writing to it. We will add another line at the end.
myFile = SD.open(myFileName, FILE_WRITE);
myFile.println("Another Line of Data"); // Send Your First Line to that file
myFile.flush();
}
Serial.println("Done Writing");
}
void loop()
{
}
[/code]
Reading an SD Card File Sample Sketch
[code lang=”C”] //Henry’s Bench// LC Studio SD Card Read From File Tutorial
//Connections: MOSI – pin 11, MISO – pin 12, CLK – pin 13, CS – pin 10
#include <SD.h>
#include <SPI.h>
int cs = 10; // Set Chip Select to pin ten
File myFile; // a File Object
void setup()
{
//
char myFileName[] = "MyFile.txt"; // The name of the file we will create
String LineString = "";
// Open serial communications and wait for port to open:
Serial.begin(9600);
while (!Serial) {
}
Serial.println("Initializing SD card…");
Serial.println();
pinMode(cs, OUTPUT);
// Documentation says you’re supposed to do this
// even if you don’t use it:
pinMode(SS, OUTPUT);
// see if the card is present and can be initialized:
if (!SD.begin(cs)) {
Serial.println("SD did not initiliaze");
while (1) ;
}
Serial.println("SD initialized.");
Serial.println();
Serial.println("Reading MyFile.txt…");
Serial.println();
// Open our File for Reading
myFile = SD.open(myFileName, FILE_READ);
// Keep Reading String until there are no more
while (myFile.available() != 0) {
// read the string until we have a newline
// Careful on using this where you don’t have newlines.
LineString = myFile.readStringUntil(‘n’);
Serial.println(LineString);
}
myFile.close();
Serial.println();
Serial.println("Done");
}
void loop()
{
}
[/code]
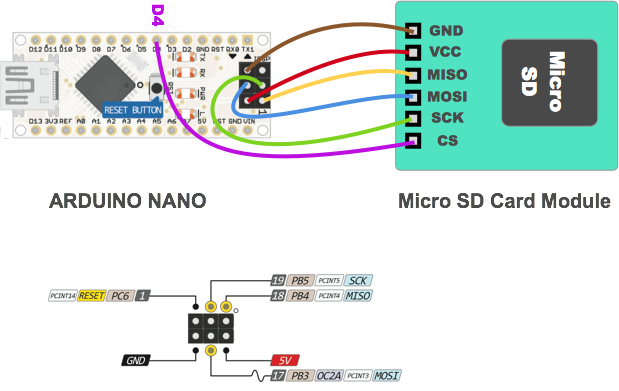
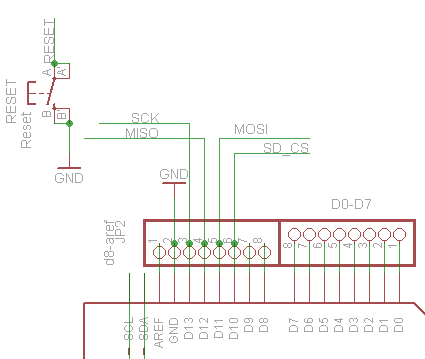
Arduino Nano SD Card Connection :
 Gambar 5.
SD card test
This example shows how use the utility libraries on which the’
SD library is based in order to get info about your SD card.
Very useful for testing a card when you’re not sure whether its working or not.
The circuit:
* SD card attached to SPI bus as follows:
** MOSI – pin 11 on Arduino Uno/Duemilanove/Diecimila
** MISO – pin 12 on Arduino Uno/Duemilanove/Diecimila
** CLK – pin 13 on Arduino Uno/Duemilanove/Diecimila
** CS – depends on your SD card shield or module.
Pin 4 used here for consistency with other Arduino examples
created 28 Mar 2011
by Limor Fried
modified 9 Apr 2012
by Tom Igoe
*/
// include the SD library:
#include <SPI.h>
#include <SD.h>
// set up variables using the SD utility library functions:
Sd2Card card;
SdVolume volume;
SdFile root;
// change this to match your SD shield or module;
// Arduino Ethernet shield: pin 4
// Adafruit SD shields and modules: pin 10
// Sparkfun SD shield: pin 8
const int chipSelect = 4;
void setup() {
// Open serial communications and wait for port to open:
Serial.begin(9600);
while (!Serial) {
; // wait for serial port to connect. Needed for native USB port only
}
Serial.print("nInitializing SD card…");
// we’ll use the initialization code from the utility libraries
// since we’re just testing if the card is working!
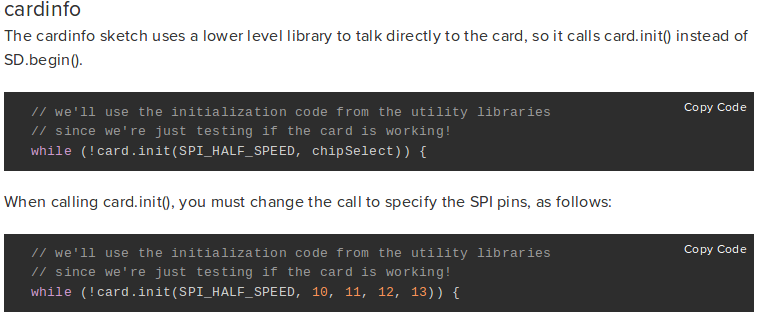
if (!card.init(SPI_HALF_SPEED, chipSelect)) {
Serial.println("initialization failed. Things to check:");
Serial.println("* is a card inserted?");
Serial.println("* is your wiring correct?");
Serial.println("* did you change the chipSelect pin to match your shield or module?");
return;
} else {
Serial.println("Wiring is correct and a card is present.");
}
// print the type of card
Serial.print("nCard type: ");
switch (card.type()) {
case SD_CARD_TYPE_SD1:
Serial.println("SD1");
break;
case SD_CARD_TYPE_SD2:
Serial.println("SD2");
break;
case SD_CARD_TYPE_SDHC:
Serial.println("SDHC");
break;
default:
Serial.println("Unknown");
}
// Now we will try to open the ‘volume’/’partition’ – it should be FAT16 or FAT32
if (!volume.init(card)) {
Serial.println("Could not find FAT16/FAT32 partition.nMake sure you’ve formatted the card");
return;
}
// print the type and size of the first FAT-type volume
uint32_t volumesize;
Serial.print("nVolume type is FAT");
Serial.println(volume.fatType(), DEC);
Serial.println();
volumesize = volume.blocksPerCluster(); // clusters are collections of blocks
volumesize *= volume.clusterCount(); // we’ll have a lot of clusters
volumesize *= 512; // SD card blocks are always 512 bytes
Serial.print("Volume size (bytes): ");
Serial.println(volumesize);
Serial.print("Volume size (Kbytes): ");
volumesize /= 1024;
Serial.println(volumesize);
Serial.print("Volume size (Mbytes): ");
volumesize /= 1024;
Serial.println(volumesize);
Serial.println("nFiles found on the card (name, date and size in bytes): ");
root.openRoot(volume);
// list all files in the card with date and size
root.ls(LS_R | LS_DATE | LS_SIZE);
}
void loop(void) {
}
[/code]
What is a Data-logger [datalogger.pbworks.com ]
As an example, if monitoring a single signal like pressure ten times a second, a 1 Gbyte SD card could record continuously for about 3.17 years; so an 8 Gbyte x 3.17 years/1 Gbyte = about 25 years. If you are monitoring 10 data points, the Arduino takes time to process the extra points, so if the maximum speed is 10 samples per second (arbitrary numbers used here for simplification), it will take one second per set of data, and the same number of years of recording are available, but sampling the data set is 10 times slower. So there is no need to worry about when to start recording. The data is output in a form compatible with importing into Excel spreadsheets. The trick is finding where the useful information begins and ends. Having the process start and stop collection, creating a spike to flag the beginning and end so they can be searched for …
1 billion samples/1 Gbyte SD Card x sec/10 samples x hour/3600 sec x day/24 hours x year/365 days =
years/1 Gbyte SD Card = 3.17 years
 Gambar 1.
  Gambar 2.
 Gambar 3.
 Gambar 4.
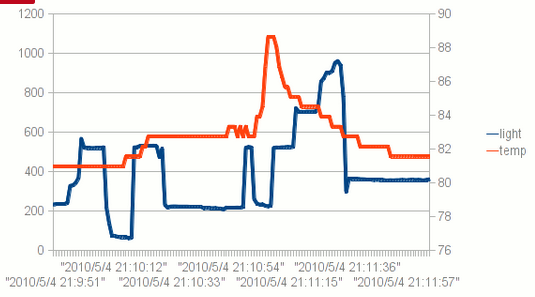 Gambar 5.
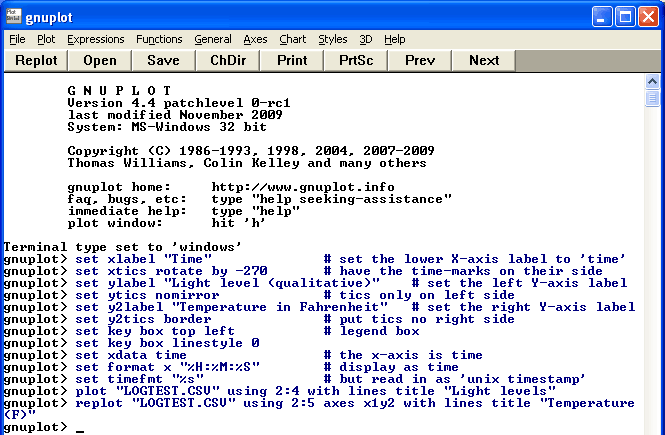 Gambar 6.
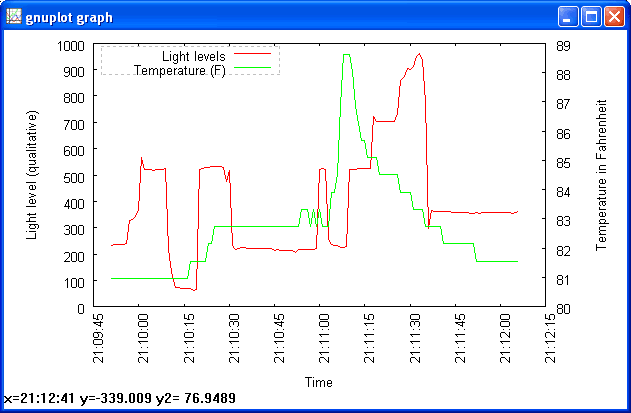 Gambar 7.
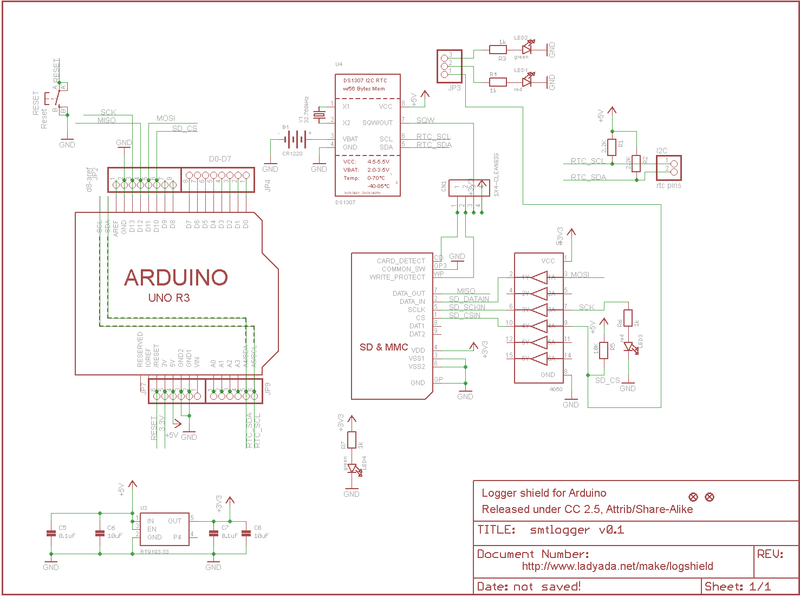
 Gambar 9.