Berikut dokumentasi singkat pembacaan masukan di aplikasi Blynk 2.0.


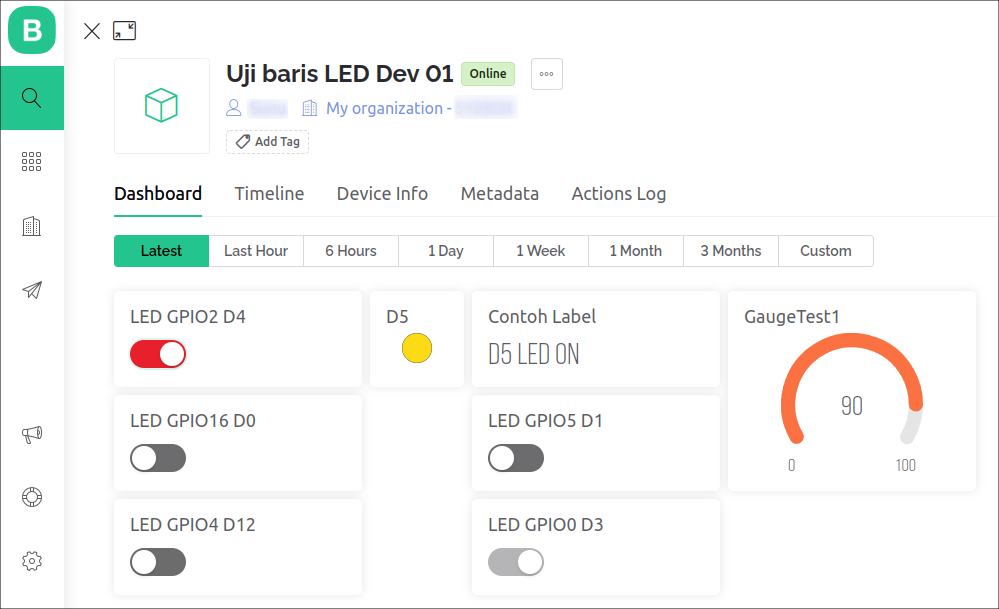
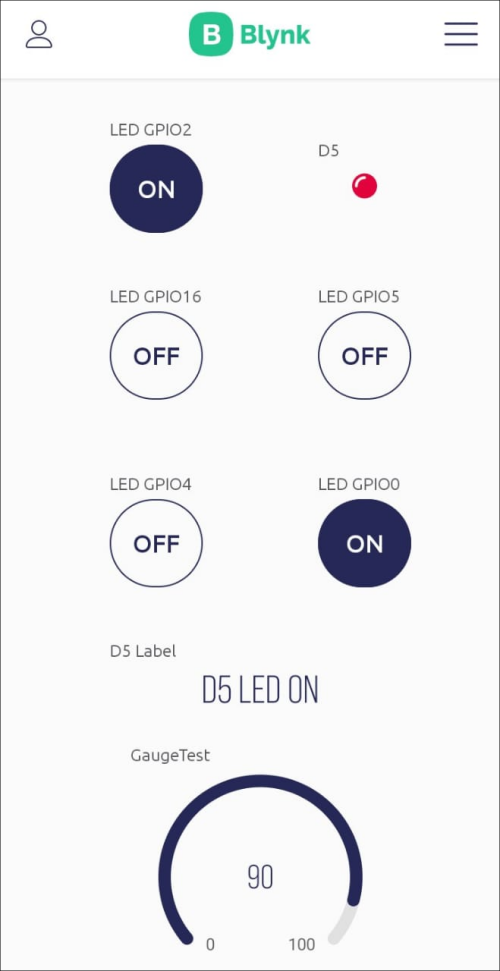
Gambar 1 dan Gambar 2 merupakan tampilan modifikasi dari dashboard sebelumnya. Modifikasi dilakukan hanya untuk menambah indikator hasil pembacaan dari ESP8266. Sebagai catatan, indikator gauge sebenarnya tidak kurang begitu optimal untuk nilai biner, tetapi di sini hanya dipakai untuk contoh singkat dengan pengerjaan cepat.

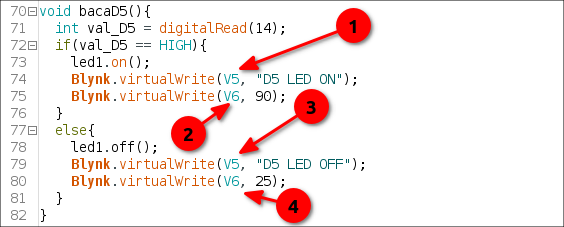
Virtual pin V5 terhubung ke widget label sedangkan V6 terhubung ke widget gauge.
Kode berikut juga dapat diunduh di Pastebin.
[sourcecode] /*************************************************************Download latest Blynk library here:
https://github.com/blynkkk/blynk-library/releases/latest
Blynk is a platform with iOS and Android apps to control
Arduino, Raspberry Pi and the likes over the Internet.
You can easily build graphic interfaces for all your
projects by simply dragging and dropping widgets.
Downloads, docs, tutorials: http://www.blynk.cc
Sketch generator: http://examples.blynk.cc
Blynk community: http://community.blynk.cc
Follow us: http://www.fb.com/blynkapp
Tweets by blynk_app
Blynk library is licensed under MIT license
This example code is in public domain.
*************************************************************
This example runs directly on ESP8266 chip.
Note: This requires ESP8266 support package:
https://github.com/esp8266/Arduino
Please be sure to select the right ESP8266 module
in the Tools -> Board menu!
Change WiFi ssid, pass, and Blynk auth token to run 🙂
Feel free to apply it to any other example. It’s simple!
*************************************************************/
/* Comment this out to disable prints and save space */
// #define BLYNK_PRINT Serial
#define BLYNK_TEMPLATE_ID "isiDenganPengenalTemplate"
#define BLYNK_DEVICE_NAME "Uji baris LED Dev 01"
#define BLYNK_AUTH_TOKEN "isiDenganAuthToken"
#include <ESP8266WiFi.h>
#include <BlynkSimpleEsp8266.h>
char auth[] = BLYNK_AUTH_TOKEN;
// Your WiFi credentials.
// Set password to "" for open networks.
char ssid[] = "mySSID";//Enter your WIFI name
char pass[] = "myPASS";//Enter your WIFI password
BlynkTimer timer;
WidgetLED led1(V4);
BLYNK_WRITE(V0){
int pinValue = param.asInt();
digitalWrite(16, pinValue);
}
BLYNK_WRITE(V1){
int pinValue = param.asInt();
digitalWrite(5, pinValue);
}
BLYNK_WRITE(V2){
int pinValue = param.asInt();
digitalWrite(4, pinValue);
}
BLYNK_WRITE(V3){
int pinValue = param.asInt();
digitalWrite(0, pinValue);
}
void bacaD5(){
int val_D5 = digitalRead(14);
if(val_D5 == HIGH){
led1.on();
Blynk.virtualWrite(V5, "D5 LED ON");
Blynk.virtualWrite(V6, 90);
}
else{
led1.off();
Blynk.virtualWrite(V5, "D5 LED OFF");
Blynk.virtualWrite(V6, 25);
}
}
void setup()
{
// Debug console
//Serial.begin(9600);
pinMode(14, INPUT); //D5 GPIO14
pinMode(16, OUTPUT); //D0 GPIO16
pinMode(5, OUTPUT); //D1 GPIO5
pinMode(4, OUTPUT); //D2 GPIO4
pinMode(0, OUTPUT); //D3 GPIO0
pinMode(2, OUTPUT); //D2 GPIO2
digitalWrite(16, HIGH); //Hanya dipakai untuk display LED
digitalWrite(2, HIGH); //Hanya dipakai untuk display LED
Blynk.begin(auth, ssid, pass);
timer.setInterval(1000L, bacaD5);
}
void loop()
{
Blynk.run();
timer.run();
}
[/sourcecode]
Rujukan:
- https://docs.blynk.io/en/blynk.apps/widgets-app
- https://examples.blynk.cc/
- https://docs.blynk.io/en/blynk.console/templates/datastreams/virtual-pin
- https://docs.blynk.io/en/blynk.console/templates/datastreams/datastreams-common-settings/default-value
- https://docs.blynk.io/en/getting-started/what-do-i-need-to-blynk/quickstart-device-code-overview
- https://rtcniser.github.io/Blynk-IoT-Blogs/2021/12/08/Blynk-IOT.html
- https://docs.blynk.io/en/getting-started/template-quick-setup/set-up-datastreams
- https://docs.blynk.io/en/blynk.edgent-firmware-api/virtual-pins
- https://community.blynk.cc/t/led-widget-not-working/42383/11
- https://community.blynk.cc/t/how-to-turn-on-widget-leds/643/4
- https://community.blynk.cc/t/cant-turn-on-a-virtual-led/14914/7
- https://github.com/blynkkk/blynkkk.github.io/blob/master/BlynkFirmware.md
- https://avantec-blynk.readthedocs.io/en/latest/usage/blynk-main-operations.html
- https://community.blynk.cc/t/blynk-write-and-blynk-read-alternatives/7006/3
- https://community.blynk.cc/t/virtual-pin-reading/1185