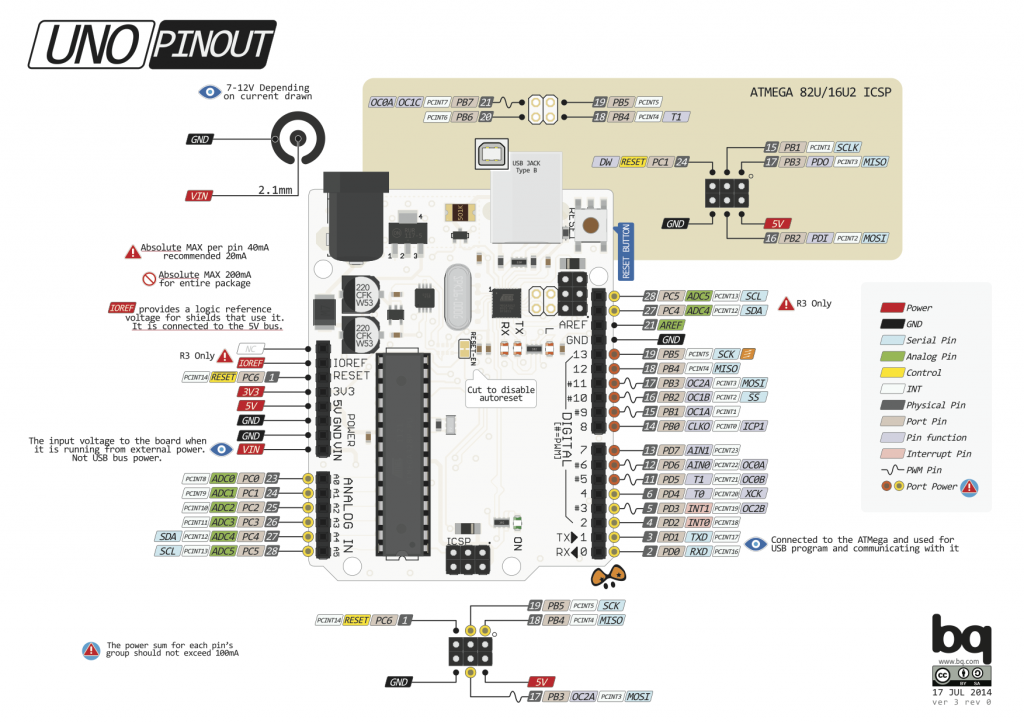
Gambar 3. [sumber]
[/su_panel] [su_panel border=”3px solid #30C0F0″ radius=”10″]
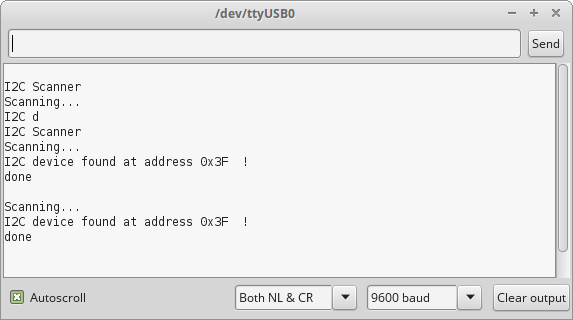
Untuk lebih mudah mendeteksi alamat dari modul LCD pada sistem i2c, kita menggunakan i2c scanner. Bagian berikut dikutip dari
https://playground.arduino.cc/Main/I2cScanner.
Last Modified: March 05, 2017, at 02:02 PM
By: Frode Grimstad Bang
 // --------------------------------------
// i2c_scanner
//
// Version 1
//    This program (or code that looks like it)
//    can be found in many places.
//    For example on the Arduino.cc forum.
//    The original author is not know.
// Version 2, Juni 2012, Using Arduino 1.0.1
//     Adapted to be as simple as possible by Arduino.cc user Krodal
// Version 3, Feb 26  2013
//    V3 by louarnold
// Version 4, March 3, 2013, Using Arduino 1.0.3
//    by Arduino.cc user Krodal.
//    Changes by louarnold removed.
//    Scanning addresses changed from 0...127 to 1...119,
//    according to the i2c scanner by Nick Gammon
//    http://www.gammon.com.au/forum/?id=10896
// Version 5, March 28, 2013
//    As version 4, but address scans now to 127.
//    A sensor seems to use address 120.
// Version 6, November 27, 2015.
//    Added waiting for the Leonardo serial communication.
//
//
// This sketch tests the standard 7-bit addresses
// Devices with higher bit address might not be seen properly.
//
#include <Wire.h>
void setup()
{
  Wire.begin();
  Serial.begin(9600);
  while (!Serial);             // Leonardo: wait for serial monitor
  Serial.println("nI2C Scanner");
}
void loop()
{
  byte error, address;
  int nDevices;
  Serial.println("Scanning...");
  nDevices = 0;
  for(address = 1; address < 127; address++ )
  {
    // The i2c_scanner uses the return value of
    // the Write.endTransmisstion to see if
    // a device did acknowledge to the address.
    Wire.beginTransmission(address);
    error = Wire.endTransmission();
    if (error == 0)
    {
      Serial.print("I2C device found at address 0x");
      if (address<16)
        Serial.print("0");
      Serial.print(address,HEX);
      Serial.println("  !");
      nDevices++;
    }
    else if (error==4)
    {
      Serial.print("Unknown error at address 0x");
      if (address<16)
        Serial.print("0");
      Serial.println(address,HEX);
    }
  }
  if (nDevices == 0)
    Serial.println("No I2C devices found");
  else
    Serial.println("done");
  delay(5000);           // wait 5 seconds for next scan
}
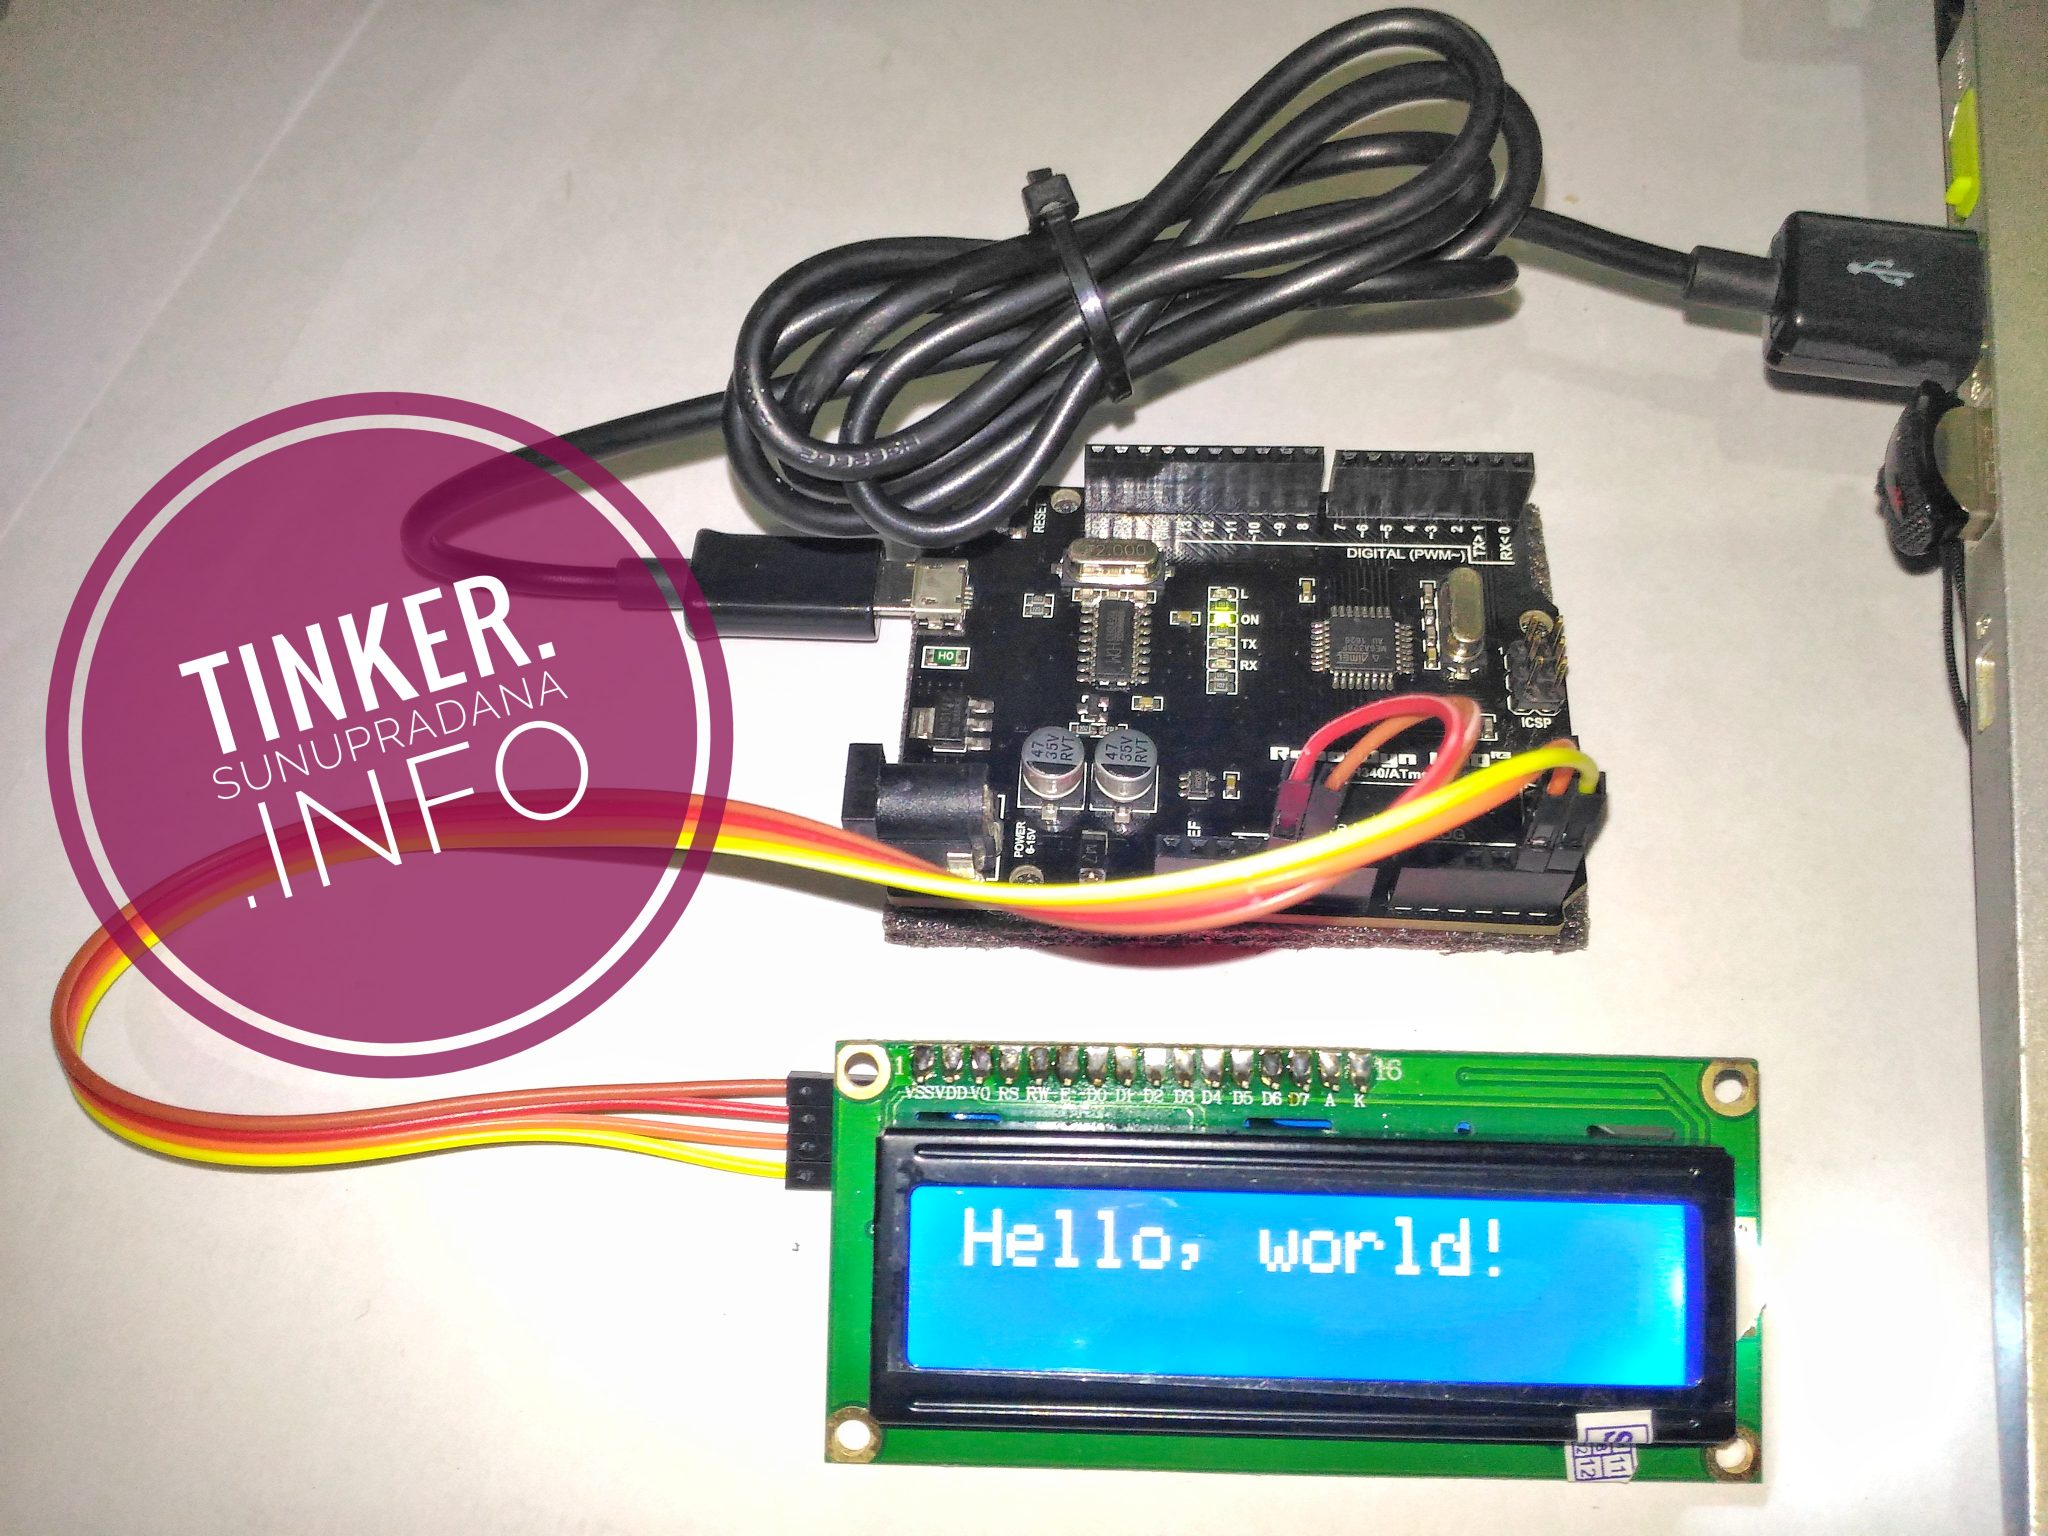
 Gambar 4.
[/su_panel] [su_panel border=”3px solid #FF6666″ radius=”10″]
Bagian berikut diadaptasi dari:
http://www.carobot.cc/how-to/lcd-16×2-or-20×4-usage-guide/
Library: fdebrabander/Arduino-LiquidCrystal-I2C-library
#include <Wire.h>
#include <LiquidCrystal_I2C.h>
LiquidCrystal_I2C lcd(0x3F,16,2);
void setup()
{
  lcd.begin();
  lcd.backlight();
  lcd.print("tinker.");
  lcd.setCursor(0,1);
  lcd.print("sunupradana.info");
}
void loop()
{
}
Gambar 5.
[/su_panel]
[su_panel border=”3px solid #00C700″ radius=”10″]
Kode pengujian berikut terinspirasi dari komenter user bernama “turbiny” di halaman Instructables. Kode ini memanfaatkan pustaka dari Francisco Malpartida.
#include <Wire.h> // Comes with Arduino IDE
#include <LiquidCrystal_I2C.h>
// Set the pins on the I2C chip used for LCD connections:
// addr, en,rw,rs,d4,d5,d6,d7,bl,blpol
LiquidCrystal_I2C lcd(0x3F, 2, 1, 0, 4, 5, 6, 7, 3, POSITIVE); // Set the LCD I2C address
Kode lengkap hasil modifikasi:
/*
Dimodifikasi dari :
YourDuino.com Example Software Sketch
20 character 4 line I2C Display
Backpack Interface labelled "LCM1602 IIC A0 A1 A2"
[email protected]
*/
/*
Contoh kode tambahan:
https://www.arduino.cc/en/Tutorial/
*/
/*-----( Import needed libraries )-----*/
#include <Wire.h> // Comes with Arduino IDE
// Get the LCD I2C Library here:
// https://bitbucket.org/fmalpartida/new-liquidcrystal/downloads/
// Move any other LCD libraries to another folder or delete them
// See Library "Docs" folder for possible commands etc.
#include <LiquidCrystal_I2C.h>
/*-----( Declare Constants )-----*/
//none
/*-----( Declare objects )-----*/
// set the LCD address to LiquidCrystal_I2C lcd(0x27, 2, 1, 0, 4, 5, 6, 7, 3, POSITIVE); for a 16 chars 2 line display
// Set the pins on the I2C chip used for LCD connections:
// addr, en,rw,rs,d4,d5,d6,d7,bl,blpol
LiquidCrystal_I2C lcd(0x3F, 2, 1, 0, 4, 5, 6, 7, 3, POSITIVE); // Set the LCD I2C address
/*-----( Declare Variables )-----*/
//none
void setup() /*----( SETUP: RUNS ONCE )----*/
{
	Serial.begin(9600); // Used to type in characters
	lcd.begin(16,2); // initialize the lcd for 16 chars 2 lines and turn on backlight
	//-------- Write characters on the display ----------------
	// NOTE: Cursor Position: CHAR, LINE) start at 0
	backLampu();
	posNol();
	delay(1000);
	lcd.clear();
	lcd.off();
	delay(1000);
	lcd.on();
	delay(1000);
	aturKursor();
	delay(1000);
	lcd.clear();
	noDis();
	delay(1000);
	lcd.clear();
	geserKanan();
	delay(1000);
	autoGeserDemo();
	delay(500);
	kananKiri();
	delay(1000);
}/*--(end setup )---*/
void loop() /*----( LOOP: RUNS CONSTANTLY )----*/
{
	// when characters arrive over the serial port...
	if (Serial.available())
	{
		uint8_t iCur = 0;
		// wait a bit for the entire message to arrive
		delay(100);
		// clear the screen
		lcd.clear();
		// read all the available characters
		while (Serial.available() > 0)
		{
			// display each character to the LCD
			lcd.write(Serial.read());
			iCur++;
			if(iCur > 15)
			{
				iCur = 0;
				lcd.setCursor(0,1);
			}
		} //EOF while
	} //EOF if
}/* --(end main loop )-- */
void backLampu()
{
	// ------- Quick 2 blinks of backlight -------------
	for(int i = 0; i< 2; i++)
	{
		lcd.noBacklight();
		delay(300);
		lcd.backlight();
		delay(200);
	}
	// lcd.backlight(); // finish with backlight on
}
void posNol()
{
	lcd.setCursor(0,0); //Start at character 0 on line 0
	delay(1000);
	lcd.print("Kolom 0 Baris 0");
	delay(1000);
	lcd.setCursor(0,1);
	lcd.print("Kolom 0 Baris 1");
	delay(1000);
}
void aturKursor()
{
	lcd.setCursor(0,0); //Start at character 0 on line 0
	lcd.print("iic lcd");
	delay(1000);
	lcd.setCursor(6,1);
	lcd.print("6:1");
	delay(2000);
}
void noDis()
{
	lcd.noDisplay();
	delay(2000);
	lcd.display();
	delay(1000);
}
void geserKanan()
{
	/* Arduino tutorial */
	lcd.setCursor(0,0);
	lcd.print("0");
	delay(1000);
	// scroll 29 positions (string length + display length) to the right
	// to move it offscreen right:
	for (int positionCounter = 0; positionCounter < 16; positionCounter++)
	{
		// scroll one position right:
		lcd.scrollDisplayRight();
		// wait a bit:
		delay(200);
	}
	delay(400);
	lcd.clear();
	lcd.setCursor(0,1);
	lcd.print("0");
	delay(200);
	for (int positionCounter = 0; positionCounter < 16; positionCounter++)
	{
		// scroll one position right:
		lcd.scrollDisplayRight();
		// wait a bit:
		delay(200);
	}
	delay(1000);
	lcd.clear();
}
void autoGeserDemo()
{
	/* Arduino tutorial */
	// set the cursor to (0,0):
	lcd.setCursor(0, 0);
	// print from 0 to 9:
	for (int thisChar = 0; thisChar < 10; thisChar++)
	{
		lcd.print(thisChar);
		delay(500);
	}
	// set the cursor to (16,1):
	lcd.setCursor(16, 1);
	// set the display to automatically scroll:
	lcd.autoscroll();
	// print from 0 to 9:
	for (int thisChar = 0; thisChar < 10; thisChar++)
	{
		lcd.print(thisChar);
		delay(500);
	}
	// turn off automatic scrolling
	lcd.noAutoscroll();
	// clear screen for the next loop:
	lcd.clear();
}
/*
	Fungsi kananKiri dimodifikasi dari:
	https://www.arduino.cc/en/Tutorial/LiquidCrystalTextDirection
*/
void kananKiri()
{
	int thisChar = 'a';
	lcd.clear();
	for(int i=0; i<26; i++)
	{
		// reverse directions at 'm':
		if (thisChar == 'm')
		{
			lcd.clear();
			lcd.setCursor(12,0);
			// go right for the next letter
			lcd.rightToLeft();
		}
		// reverse again at 's':
		if (thisChar == 's')
		{
			lcd.clear();
			lcd.setCursor(5,0);
			// go left for the next letter
			lcd.leftToRight();
		}
		// reset at 'z':
		if (thisChar > 'z')
		{
			// go to (0,0):
			lcd.home();
			// start again at 0
			thisChar = 'a';
		}
		// print the character
		lcd.write(thisChar);
		// wait a second:
		delay(500);
		// increment the letter:
		thisChar++;
	}
	delay(800);
	lcd.clear();
}
/* ( THE END ) */
[/su_panel] [su_panel border=”3px solid #f1c112″ radius=”10″]