Catatan untuk penggunaan LCD shield.
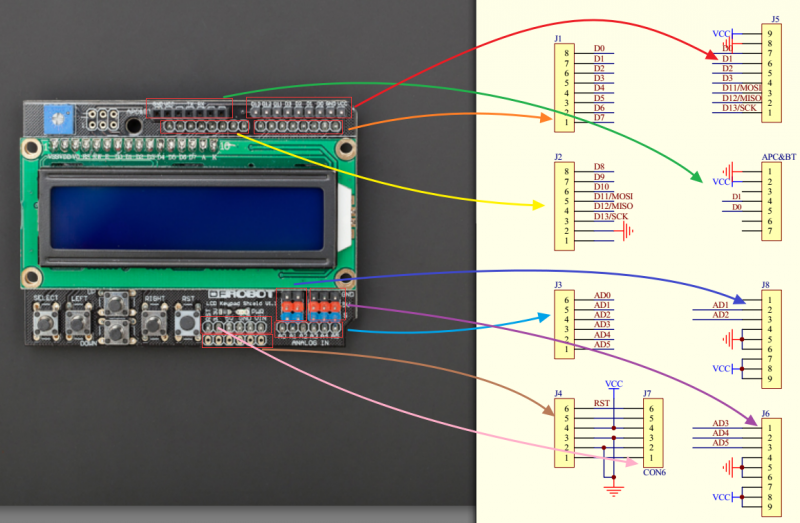
Ada dua versi dari LCD shield dari DFRobot yaitu versi 1.0 dan versi 1.1. Gambar 1 adalah V1.0 dan Gambar 2 adalah versi V1.1.
Gambar 1. [sumber]
 Gambar 2. [sumber]
Pada beberapa bagian kedua versi papan ini memiliki kesaamaan.
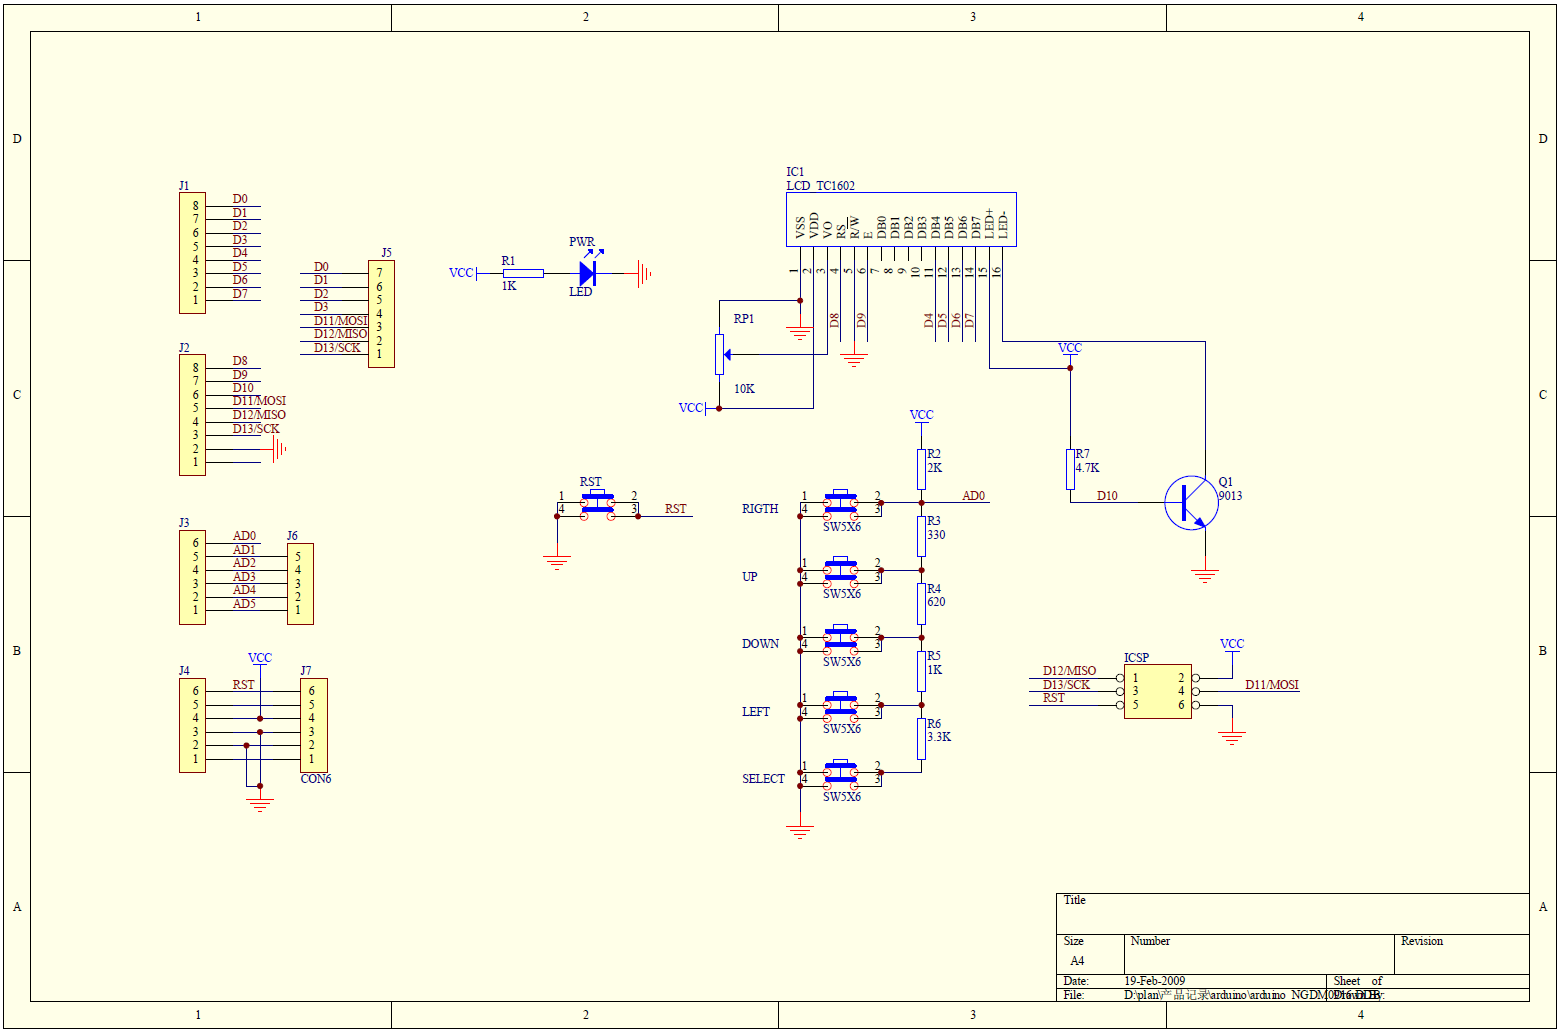
 Gambar 3. [sumber]
Gambar 4. [sumber]
Contoh kode 01 [sumber]:
/*************************************************************************************
  Mark Bramwell, July 2010
  This program will test the LCD panel and the buttons.When you push the button on the shield,
  the screen will show the corresponding one.
  Connection: Plug the LCD Keypad to the UNO(or other controllers)
**************************************************************************************/
#include <LiquidCrystal.h>
LiquidCrystal lcd(8, 9, 4, 5, 6, 7);           // select the pins used on the LCD panel
// define some values used by the panel and buttons
int lcd_key     = 0;
int adc_key_in  = 0;
#define btnRIGHT  0
#define btnUP     1
#define btnDOWN   2
#define btnLEFT   3
#define btnSELECT 4
#define btnNONE   5
int read_LCD_buttons(){               // read the buttons
    adc_key_in = analogRead(0);       // read the value from the sensor
    // my buttons when read are centered at these valies: 0, 144, 329, 504, 741
    // we add approx 50 to those values and check to see if we are close
    // We make this the 1st option for speed reasons since it will be the most likely result
    if (adc_key_in > 1000) return btnNONE;
    // For V1.1 us this threshold
    if (adc_key_in < 50)   return btnRIGHT;
    if (adc_key_in < 250)  return btnUP;
    if (adc_key_in < 450)  return btnDOWN;
    if (adc_key_in < 650)  return btnLEFT;
    if (adc_key_in < 850)  return btnSELECT;
   // For V1.0 comment the other threshold and use the one below:
   /*
     if (adc_key_in < 50)   return btnRIGHT;
     if (adc_key_in < 195)  return btnUP;
     if (adc_key_in < 380)  return btnDOWN;
     if (adc_key_in < 555)  return btnLEFT;
     if (adc_key_in < 790)  return btnSELECT;
   */
    return btnNONE;                // when all others fail, return this.
}
void setup(){
   lcd.begin(16, 2);               // start the library
   lcd.setCursor(0,0);             // set the LCD cursor   position
   lcd.print("Push the buttons");  // print a simple message on the LCD
}
void loop(){
   lcd.setCursor(9,1);             // move cursor to second line "1" and 9 spaces over
   lcd.print(millis()/1000);       // display seconds elapsed since power-up
   lcd.setCursor(0,1);             // move to the begining of the second line
   lcd_key = read_LCD_buttons();   // read the buttons
   switch (lcd_key){               // depending on which button was pushed, we perform an action
       case btnRIGHT:{             //  push button "RIGHT" and show the word on the screen
            lcd.print("RIGHT ");
            break;
       }
       case btnLEFT:{
             lcd.print("LEFT   "); //  push button "LEFT" and show the word on the screen
             break;
       }
       case btnUP:{
             lcd.print("UP    ");  //  push button "UP" and show the word on the screen
             break;
       }
       case btnDOWN:{
             lcd.print("DOWN  ");  //  push button "DOWN" and show the word on the screen
             break;
       }
       case btnSELECT:{
             lcd.print("SELECT");  //  push button "SELECT" and show the word on the screen
             break;
       }
       case btnNONE:{
             lcd.print("NONE  ");  //  No action  will show "None" on the screen
             break;
       }
   }
}
Contoh kode 02 [sumber]:
/*******************************************************
   Description:
   Reads an analog input on pin 1, prints the result to the LCD.
   This program takes the temperture sensor LM35 for example.
   Connection:
   Plug the LCD Keypad to the UNO(or other controllers)
   Temperture sensor:
   S(blue) -- A1()
     Note: A0 has been occupied.
   VCC(red) -- VCC
   GND(black) -- GND
********************************************************/
#include <LiquidCrystal.h>
LiquidCrystal lcd(8, 9, 4, 5, 6, 7);        // select the pins used on the LCD panel
unsigned long tepTimer ;
void setup(){
    lcd.begin(16, 2);                       // start the library
}
void loop(){
    lcd.setCursor(0, 0);                   // set the LCD cursor   position
    int val;                               // variable to store the value coming from the analog pin
    double data;                           // variable to store the temperature value coming from the conversion formula
    val=analogRead(1);                     // read the analog in value:
    data = (double) val * (5/10.24);       // temperature conversion formula
    if(millis() - tepTimer > 500){         // output a temperature value per 500ms
             tepTimer = millis();
             // print the results to the lcd
             lcd.print("T: ");
             lcd.print(data);
             lcd.print("C");
     }
}
Contoh kode 03 [sumber]:
/*
DFRobot LCD Shield for Arduino
Key Grab v0.2
Written by Glendon Klassen
[email protected]
http://www.sourceforge.net/users/ecefixer
http://ecefixer.tumblr.com
Displays the currently pressed key on the LCD screen.
Key Codes (in left-to-right order):
None   - 0
Select - 1
Left   - 2
Up     - 3
Down   - 4
Right  - 5
*/
#include <LiquidCrystal.h>
#include <DFR_Key.h>
//Pin assignments for DFRobot LCD Keypad Shield
LiquidCrystal lcd(8, 9, 4, 5, 6, 7);
//---------------------------------------------
DFR_Key keypad;
int localKey = 0;
String keyString = "";
void setup()
{
  lcd.begin(16, 2);
  lcd.clear();
  lcd.setCursor(0, 0);
  lcd.print("Key Grab v0.2");
  delay(2500);
  /*
  OPTIONAL
  keypad.setRate(x);
  Sets the sample rate at once every x milliseconds.
  Default: 10ms
  */
  keypad.setRate(10);
}
void loop()
{
  /*
  keypad.getKey();
  Grabs the current key.
  Returns a non-zero integer corresponding to the pressed key,
  OR
  Returns 0 for no keys pressed,
  OR
  Returns -1 (sample wait) when no key is available to be sampled.
  */
  localKey = keypad.getKey();
  if (localKey != SAMPLE_WAIT)
  {
    lcd.clear();
    lcd.setCursor(0, 0);
    lcd.print("Current Key:");
    lcd.setCursor(0, 1);
    lcd.print(localKey);
  }
}